If you are using a laptop or desktop system that doesn’t meet the system requirement of Windows 11 that is the availability of Secure boot and TPM 2.0; then here is the solution to create a bootable USB drive of Windows 11 but by removing TPM and Secure boot requirements.
Windows 11 is the latest operating system from Microsoft and a successor of Windows 10. However, there are some limitations imposed by the company to refrain users from installing Win 11, who have a computer without TPM and Secure boot features. Nevertheless, as everything has some solution, so has this one.
Although we already have created a tutorial around this topic to learn how to Bypass TPM and Secure boot detection for installing Windows 11, however, that was a little bit geeky and users need to fiddle with some files manually. To mitigate the user manual effort and make things a bit easier, Rufus comes into the picture.
For those who don’t know about Rufus, it is an open-source tool available on GitHub for creating Linux and Windows bootable USB drives safely and easily. Unfortunately, it is only available for Windows users, therefore to use it you must have existing Windows operating either on your physical or virtual machine.
So, cut the story short, Rufus has introduced a feature especially for creating Windows 11 bootable USB drive, in which if the user wants can remove the TPM and Secure boot mandatory support requirements. And here we let you know how to do that.
Create a Windows 11 bootable USB Drive using Rufus to bypass TPM and Secure boot
1. Download Rufus- Latest version
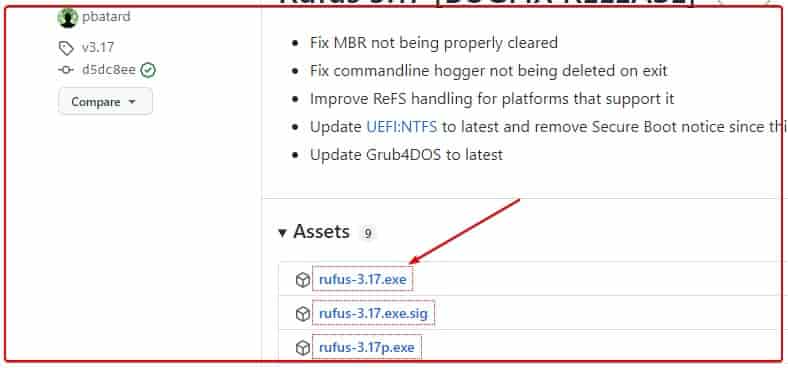
Either visit the official website of Rufus or the project GitHub page to get the latest available version of this free USB creator tool. Once you have downloaded the latest executable file move to the next step.

2. Get Windows 11 ISO file
If you already have a Windows ISO file then it is good, you can move to the next step. Otherwise, see our tutorial on how to download Window 11 ISO images from its official website.
3. Attach USB to PC and Run Rufus
Now, insert a USB drive of at least 4GB into your PC to make it a bootable one. After that run the downloaded executable file of Rufus. It is portable software, hence you don’t need to install anything. Running Rufus executable file will directly open the GUI interface to easily create bootable USB drives.
4. Select the USB drive and Windows 11 ISO
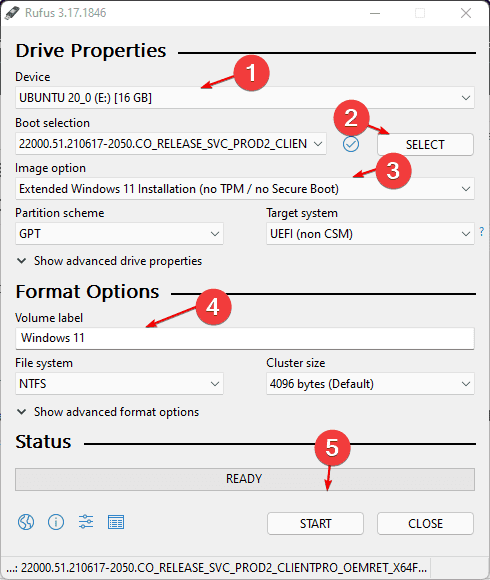
Now, from the drop-down box, select the attached USB drive that you want to make bootable. And after that click on the SELECT button to insert the downloaded Win ISO file.
5. ByPass (Extended windows 11 installation (no TPM / no secure boot)
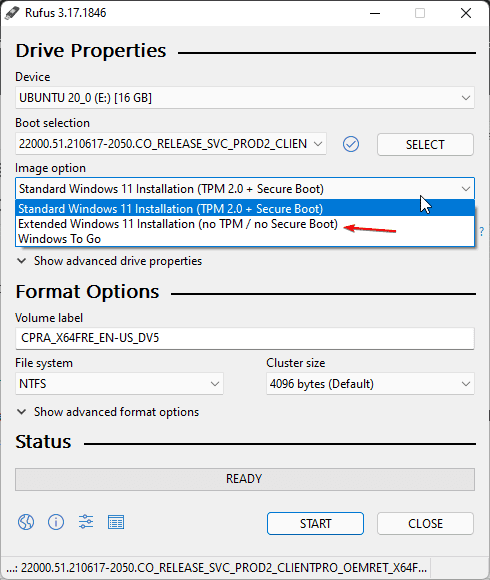
As you insert the ISO, the Rufus will automatically detect the Windows 11 OS to avail two options.
1. Standard Windows 11 ISO installation (TPM 2.0+secure boot)
2. Extended Windows 11 ISO installation (not TPM / no Secure boot)
As here we want to make a bootable drive of Win 11 to run on non-TPM and secure boot supported hardware. Hence, select the second option from the drop-down box.

6. Start making Windows 11 bootable USB drive
Finally, all the required things are set, now do one thing more- give some pretty name to your – Volume label. For example- win 11 this will be your USB drive name once the writing of the ISO disk will be done.
After that click on the START button. Rufus will ask for your permission to format the drive, hit the YES button.

Once done, unplug the drive and insert it to the PC where you want to install Win 11. Restart the system and boot it with your plugged-in USB drive.
Related Posts
How to use the XLOOKUP function in Microsoft Excel with Example
Check the RAM type on Windows 11 or 10. See what DDR RAM you have on your PC in different ways
How to Check Firmware in CMD on Windows 11 or 10
How to Change WIFI or Ethernet MAC address on Windows 11 or 10?
How to Install 7-Zip on Windows 11 or 10 with Single Command
Install Google Earth on Windows 11 or 10 Using a Single Command