Learn the steps to skip or bypass the Windows 11 internet or network requirement for the installation during out-of-box experience (OOBE) using Shit+F10 keys.
Windows 11 is the latest version of the operating system provided by the Microsoft Team. However, with the release of the 22H2 version, Windows 11 users need to have an internet connection on their PC or laptop to complete the initial setup. This can be a headache, if you don’t have access to the internet or your system needs some hardware driver to get Wi-Fi or LAN access. In such scenarios, if you are using Home or Pro editions of Windows 11 then here in this article you can bypass the page “Let’s connect you to network” where the OS asks you to connect the internet connection to continue the setup or out-of-box experience (OOBE).
ByPass the Windows 11 Internet requirement for installation
Requirements:
We are assuming that you already have a PC or laptop that supports Windows 11 and the only thing that you are looking for is to know how to install it without an internet (ethernet or Wi-Fi) connection.
Here are a few things that you require to install this OS on any compatible PC.
- A bootable Windows 11 Installation Media (USB or DVD).
- A Compatible PC: Ensure that your computer meets the minimum system requirements for Windows 11. These include a 64-bit processor with at least 1 GHz clock speed, 4 GB of RAM, and 64 GB of storage, among other things such as TPM.
- Product Key: Have a valid Windows 11 product key or else you can skip it to set it up later.
Note: if you just want to know the Windows 11 internet bypass method then direct jump to step no 9. whereas those who want to know the regular installation steps can read the whole article.
Step 1: Insert the Windows 11 Installation Media:
The first thing insert your bootable Windows 11 USB drive or DVD into your computer’s appropriate port. Learn – Create a Windows 11 bootable USB drive with no TPM & no Secure Boot
Step 2: Boot from the Installation Media:
After plugging the bootable Windows 11 drive restart your computer and boot from the installation media. For that, you need to access the system Boot menu by using the Del or Esc key as per your computer’s BIOS or UEFI settings to set the boot order to prioritize the USB drive or DVD drive.
Step 3: Begin the Installation:
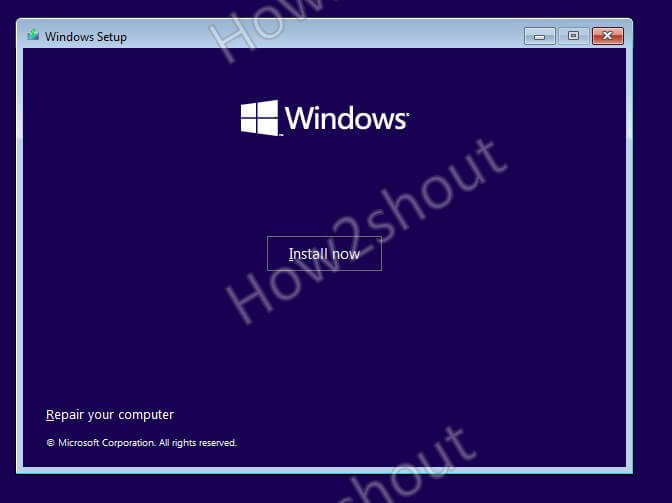
Once your computer boots from the installation media, you will see the Windows 11 setup screen. Click the “Install Now” button.

Step 4: Enter Your Product Key:
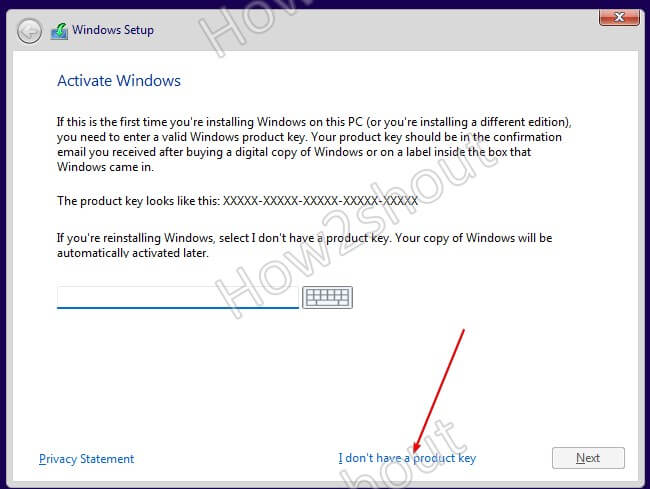
Enter your valid Windows 11 product key when prompted. Click “Next” to proceed or else you can select the “I don’t have a product key” option and click on the “Next” button to start the installation process without any key.

Following, select Windows 11 Pro edition or any other you want to install, and proceed further by clicking on the “Next” button.

Accept License terms.

Step 6: Choose Installation Type:
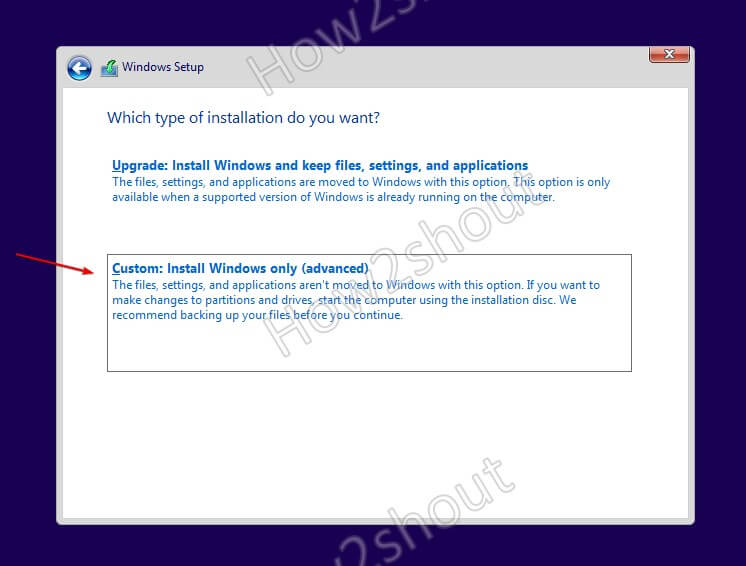
Select the “Custom: Install Windows only (advanced)” option. This allows you to perform a clean installation.

Step 7: Partition and Format Drives
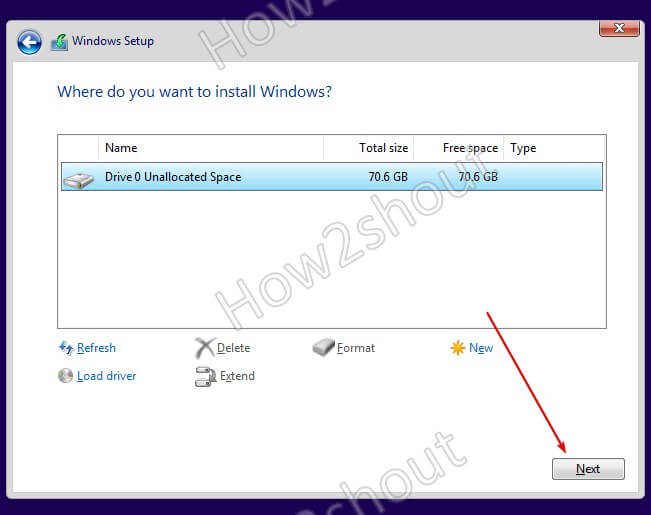
Simply click on the “Next” button and the system will automatically format the hard drive to install Windows 11.

The copying of the file will take a few minutes after that, you will have the wizard to set up Windows 11 further.
Step 8: Out-of-the-box experience (OOBE)
Once the initial copying and settings are completed by the Windows 11 installation wizard, the system will be rebooted and give you the OOBE screen to set up the OS further.
Select your country or region and after that choose the right keyboard layout at your convenience and skip the second layout…

Step 9: Windows 11 – Let’s connect you to a network
Are you stuck on “let’s connect you to a network in Windows 11”?
If yes, then here is the main part of this tutorial where Windows 11, if didn’t find the internet connection will display the “Let’s connect you to a network” or “Oops, you’ve lost internet connection” page.
The page will further state – “You’ll need an internet connection to continue setting up your device. Once connected, you’ll get the latest features and security updates”.

To bypass the let’s connect you to a network page, press the “Shift + F10” keys to open a command prompt.
Once you have the CMD window, type this command OOBE\BYPASSNRO and press the Enter key to bypass the internet requirement for the Windows 11 installation. This will immediately restart your PC.

Wait for a few seconds and let your system start. Again follow the OOBE steps such as selecting the region and keyboard layout to reach again to “Let’s Connect you to network” page. But this time you will see the “I don’t see Internet” option on it. Click on that and select the “Continue with limited setup” option.


Complete the Setup:
Enter the name you want to use for your Windows 11’s user Account and following that set the password and other settings to complete the installation setup without network.
Follow the on-screen instructions to finish the initial setup process. Windows 11 will finalize the installation. Check out: Windows 11 Desktop and Keyboard Shutdown shortcuts

Install Drivers (If Necessary):
If your PC or laptop requires some additional drivers that are not available through Windows 11 then download and install them offline, manually.
Update Windows (Optional):
Once you have successfully installed Windows 11, you can connect to the internet, if available to manually update the operating system for the latest security patches and feature updates.
Conclusion:
Well, I don’t know why Microsoft day by day making the installation of Windows so complicated. Nevertheless, if you have an internet connectivity issue and still want to install Windows 11 then this guide will solve your problem.
FAQ:
Can we use Windows 11 without the internet?
Yes, once you have installed Windows 11 without the internet using this tutorial you will be able to use it without any external network.
How do we skip the ethernet or Wi-Fi setup in Windows 11 or 10?
Pressing the Shift+F10 keyboard shortcut on the network setup page of Windows 11 will open the command prompt and after that run the OOBE BypassNRO command to skip the Wifi setup requirement.
Can you install Windows 11 for free?
We can install Windows 11 free of cost by downloading its ISO from the official website and selecting the “I don’t have a product key” option while installing it, however for a limited time because eventually, a user has to Activate it.
Other Articles:
Related Posts
How to Archive a WhatsApp Conversation Without Deleting
How to Clear or Delete Archived Emails in Gmail
How to Clear Google Search History?
2 best Android Apps to open zip or archive files on the smartphone
How to use the XLOOKUP function in Microsoft Excel with Example
How to set up an out-of-office responder on Gmail? Step-by-step guide on setting up a Vacation responder